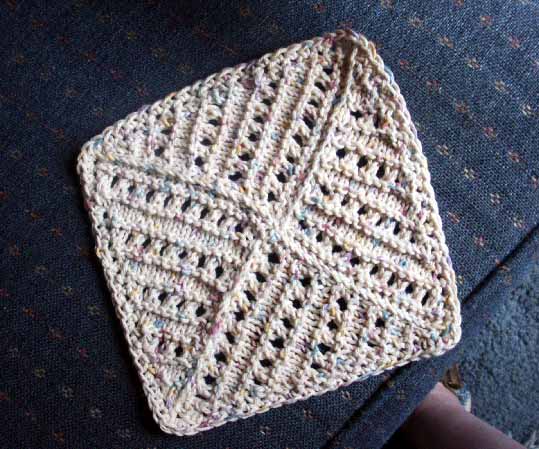
Pinwheel Dishcloth
 Here is my other creation from February 2000. Thank you Mary Mort, for finding it for me since mine had disappeared!
01/21/2019 - I have fixed this pattern. It's been a long time since I originally designed it, and I had stopped knitting for a while. When I got inquiries about why this didn't work out right on the fourth triangle, I just didn't have time to look at it and fix it. So recently, I decided to make one, and YES, there was an error. Sorry about that!
Pinwheel Dishcloth
The eyelet triangle used for this pattern is from the Magical Mitered Vest Pattern copyright Jill Vosburg 1998, all rights reserved. http://www.justonemorerow.com/ The triangle is used here with her permission. This dishcloth pattern may be shared freely if this entire copyright notice is included.
As for the rest of the pattern, it was developed by Janine Tinklenberg (JanTink@sbcglobal.net), who gives you permission to share it freely as long as this copyright notice is included.
Four triangles make up the dishcloth. The long (right) sides of the triangle become the outside edges of the dishcloth.
1 skein worsted weight cotton, such as Sugar 'n Cream
size 7 or 8 needles
crochet hook size G
Cast on 21 sts.
Row 1: (Wrong side) Sl 1, k to end of row (ridge).
Row 2: Sl 1, k2tog, k to end of row.
Row 3: Sl 1, work (p2tog, yo) to last 3 sts, p2, k1
Row 4: Repeat row 2.
Row 5: Repeat row 1 (ridge made).
Row 6: Repeat row 2.
Row 7: Sl 1, p to last st, k1.
Row 8: Repeat row 2.
Repeat rows 1-8 until 4 sts remain, ready to work a wrong side row next.
Sl 1, p2, k1, turn.
Sl 1, k2tog, k1, turn.
Sl 1, p1, k1, turn.
Sl 1, k2tog, turn.
Sl 1, p1, turn.
K2tog.
First triangle made.
Pick up stitches along straight (left) edge of triangle until you have a total of 21 sts. Work a 2nd triangle the same way as the first. Repeat for a 3rd triangle. (You are adding the triangles in a counter-clockwise direction.)
Pick up 21 stitches for the 4th and final triangle. This will leave you in the center of the dishcloth. Work 4th triangle as follows:
Row 1: (Wrong side) Pick up stitch on side of the 1st triangle, p tog with first stitch, k to end of row (ridge).
Row 2: Sl 1, knit 2 tog, k to end of row.
Row 3: Row 3: Pick up stitch on side of 1st triangle, work (p2tog, yo) to last 3 sts, p2, k1
Row 4: Repeat row 2.
Row 5: Repeat row 1 (ridge made).
Row 6: Repeat row 2.
Row 7: Sl 1, p to last st, k1.
Row 8: Repeat row 2.
Repeat rows 1-8 until 4 sts remain, ready to work a wrong side row next.
Pick up stitch on side of 1st triangle, p tog with first stitch, p2, k1, turn.
Sl 1, k2tog, k1, turn.
Pick up stitch on side of 1st triangle, p tog with first stitch, p1, k1, turn.
Sl 1, k2tog, turn.
Pick up stitch on side of 1st triangle, p tog with first stitch, p1, turn.
K2tog.
You should have enough loops on the cast on edge of the first triangle to attach the 4th triangle by picking up stitches and purling them with the first stitch in the row. Periodically eyeball and smooth it to make sure it is laying flat and that you aren't crowding the rows or spacing them too far apart.
After you have finished knitting the 4th triangle, sc around the outside, doing 3 sc in each corner. Cut yarn and weave in ends. If you are a crochetophobe, you may substitute applied i-cord, but this is a dishcloth for petesakes!
For a lacy looking face cloth (yes it's that pretty!), do a nice crocheted shell stitch around the edge.For a different look make two opposing triangles one color and the other two triangles a different color (helps use up those leftover bits from other dishcloths!). Or make every triangle a different color for a really great look!
posted by JanTink @ 4:30 PM
9 comments
![]()


